Server Farm in the Palm of your hand
|
I have recently been
exploring Docker containers on SBCs (Small Board Computers), including the Raspberry Pi. The Docker eco-system is impressive in the amount of preconfigured containers that are available. However, as I have written before, it falls down on networking support, specifically IPv6 support. The best one can do is NAT6 on IPv6, which just perpetuates the complexities (and evils) of NAT.
The biggest problem with the Docker IPv6 implementation is that it was an after thought. Unfortunately, this is not uncommon. Think of adding security after the fact, and you will quickly discover the poorly implemented security model. Docker is limited in this kind of after-thought thinking.
Linux Containers
Another
container technology which can also run on SBCs is Linux Containers (LXC/LXD). LXC shares the host's kernel and is lighter weight than traditional Virtual Machines. But each LXC Container is isolated via namespaces and control groups, so it appears to have its own network stack. And therefore is more flexible than Docker.
Qualifying the SBC OS for LXC/LXD
Before going too far in installing Linux Containers, it is best to ensure that the OS will support LXC. There are a couple of requirements of the Host OS:
- Is LXD and LXD-Client in the repo (easy to install with apt-get)
- Does the kernel support namespaces
The first is easy, search for the packages:
$ apt-cache search lxd-client
lxd-client - Container hypervisor based on LXC - client
The second involves what support was compiled into the kernel when it was built. Namespaces allow the kernel to create separate network areas, each with its own firewall rules. The easiest way to determine this is to look for namespace items in
/proc
$ ls /proc/self/ns
ipc  mnt  net  pid  user  uts
Unfortunately, the raspian kernel from
raspberrypi.org doesn't support namespaces.
Getting a LXC/LXD compatible OS
Fortunately, there is an
unofficial Ubuntu 18.04 image available for the Pi which does. This image is compressed and must be decompressed before
flashed to a SD Card.
Make sure you follow the
steps on the Ubuntu page to set an initial password for the
ubuntu user.
Additionally follow the steps to
boot the unofficial image on the Raspberry 3B+. Be sure to update the
config.txt file and update the bootloader files. The
Raspsberry 3B can boot the unofficial image without these extra steps.
Preparing the LXC Host (aka the Pi)
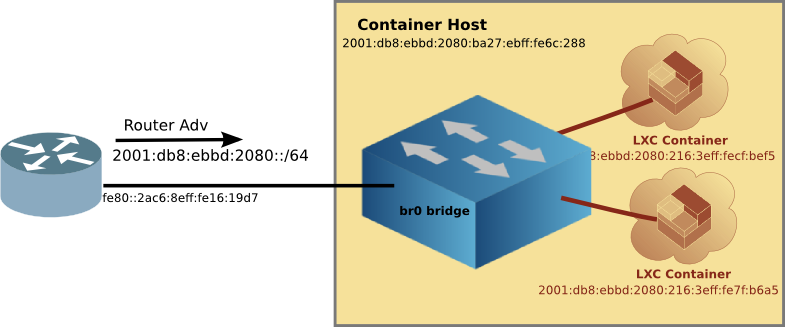
The key networking difference between Docker and LXC is that with LXC one can attach a
container to any bridge on the Host. This includes a bridge on the outside interface. Via
transparent bridging the
container can have unfettered access to the existing IPv6 subnet, including picking up Global Unique Addresses (GUAs) without the host having to do router-like functions, such as adding routes, auto propagation of prefixes (with DHCPv6-PD), redistribution of routes, etc. Again, things which Docker doesn't support.
Setting up an external bridge interface on the Host
Once you have the right kernel and distro, configure a bridge
br0 which will in-turn have the ethernet interface as a member. This is best done from the Pi itself using a keyboard and monitor, rather than
ssh-ing to a headless device. Because when you mess up, you are still connected to the Pi (believe me, it is easy to get disconnected with all interfaces down). Logically the bridge,
br0 will not only be attached to the
eth0 interface, but later on, the LXC Containers as well.

Installing LXC/LXD
Once setting up the br0 interface is done, we can install
lxd and
lxd-client. Linux Containers has been evolving of the years, and it is now (as I write this) up to version 3.0.2.
A note about versions
There is quite a bit on the internet about older versions of Linux Containers. If you see hyphenated commands like
lxc-launch then
stop and move to another page. Hyphenated commands are the older version 1 or 2 of Linux Containers.
A quick tour of LXC/LXD
Canonical has a nice
Try It page, where you can run LXC/LXD in the comfort of your web browser without installing anything on your local machine. The
Try It sets up a VM which has IPv6 access to the outside world, where you can install and configure LXC/LXD, even create Linux Containers. It is well worth the 10 minutes to run through the hands on tutorial.
Doing the install
Installing LXD will pull in
lxc as well. And because we are using Ubuntu 18.04LTS, it is as simple as using
apt-get
sudo apt-get install lxd lxd-client
But wait! It is already installed on this image. Although it is version 3.0.0, and the easiest way to get it to the latest version is to run:
$ sudo apt-get update
$ sudo apt-get upgrade lxd lxd-client
Add yourself to the
lxd group so you won't have to type
sudo all the time.
sudo usermod -aG lxd craig
newgrp lxd
LXD Init
The LXD init script sets up LXD on the machine with a set of interactive questions. It is safe to accept all the defaults (just press return).
Default LXD Networking
Since we took all the defaults of
lxd init it created another bridge on the system
lxdbr0 which the YAML file would lead you to believe it is also bridged to the outside world, but
it is not. The default config is similar to Docker, in that it creates a
lxdbr0 bridge which uses NAT4 and NAT6 to connect to the outside world.
But we don't care, because we have created a bridge
br0 which
is transparently bridged to the outside world. And
unlike Docker, individual containers can be attached to any bridge (either
br0 or if you want NAT,
lxdbr0)
Create a profile for the external transparent bridge (br0)
There is one more thing we have to do before running the first Linux Container, create a profile for the
br0 bridge. Edit the profile to match the info below:
lxc profile create extbridge
lxc profile edit extbridge
    config: {}
    description: bridged networking LXD profile
    devices:
      eth0:
        name: eth0
        nictype: bridged
        parent: br0
        type: nic
    name: extbridge
    used_by:
Note: if you prefer
vi to whatever editor comes up when editing the profile, set the environment variable below, then edit the profile.
export EDITOR=vi
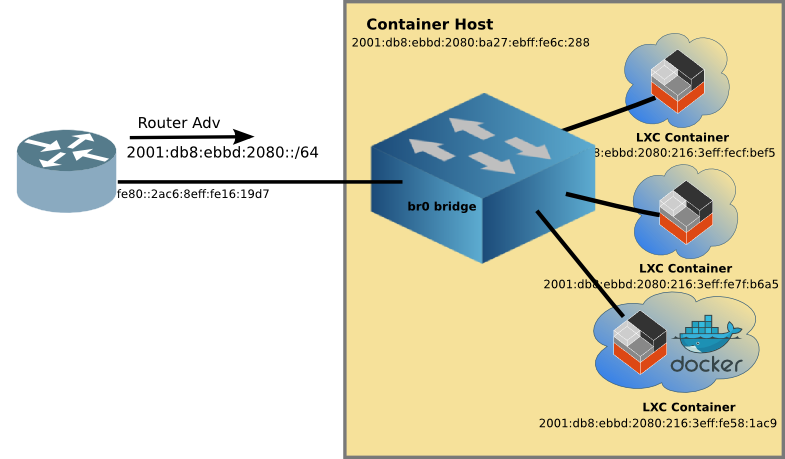
The Linux Container network is now ready to attach containers to the
br0 bridge like this:

You may notice the bottom LXC container with Docker, more on this later.
Running the first Linux Container
So now it is time to have fun by running the first container. I suggest
Alpine Linux because it is small, and quick to load. To create and start the container type the following:
lxc launch -p default -p extbridge images:alpine/3.8 alpine
LXD will automatically download the
Alpine Linux image from the
Linux Containers image server, and create a container with the name
alpine. We'll use the name
alpine to manage the container going forward.
Typing
lxc ls will list the running containers
$ lxc ls
+---------+---------+------------------------+----------------------------------------------+------------+-----------+
|  NAME   |  STATE  |          IPV4          |                     IPV6                     |    TYPE    | SNAPSHOTS |
+---------+---------+------------------------+----------------------------------------------+------------+-----------+
| alpine  | RUNNING | 192.168.215.104 (eth0) | fd6a:c19d:b07:2080:216:3eff:fecf:bef5 (eth0) | PERSISTENT | 0         |
|         |         |                        | 2001:db8:ebbd:2080:216:3eff:fecf:bef5 (eth0) |            |           |
+---------+---------+------------------------+----------------------------------------------+------------+-----------+
You will note that the container has not only a IPv4 address from my DHCP server, but it also has an IPv6 GUA (and in this case, an additional IPv6 ULA, Unique Local Address).
YAML overlaying
The
alpine container has a GUA because we used two
-p (profile) parameters when creating it. The first is the
default profile which as I mentioned earlier is set up for NAT4 and NAT6. And the second is the
extbridge profile we setup as a profile. The
lxc launchcommand pulls in the YAML info from the
default profile, and then
overlays the
extbridge profile, effectively overwriting the parts we want so that the
alpine container is attached to
br0 and the outside world!
Stepping into Alpine
Of course, what good is starting a Linux Container if all you can do is start and stop it. A key difference from Docker is that Linux Containers are
not read-only, but rather you can install software, configure it the way you like, and then stop the container. When you start it again, all the changes you made are still there. I'll talk about the goodness of this a little later.
But in order to do that customization one needs to get inside the container. This is done with the following command:
$ lxc exec alpine -- /bin/sh
~ #
And now you are inside the running container as root. Here you can do anything you can do on a normal linux machine, install software, add users, start sshd, so you can ssh to it later, and so on. When you are done customizing the container type:
~ # exit
craig@pai:~$
And you are back on the LXC Host.
Advantages of customizing a container
A key advantage of customizing a container, is that you can create a template which then can be used to crate many instances of that customized application. For example, I started with
alpine installed
nginx and
php7 and created a template image, which I called
web_image. I used the following commands on the host, after installing the webserver with PHP inside the container:
$ lxc snapshot alpine snapshot_web                   # Make a back up of the container
$ lxc publish alpine/snapshot_web --alias web_image  # publish the back up as an image
$ lxc image list                                     # show the list of images
+--------------+--------------+--------+--------------------------------------+--------+----------+-----------------------------+
|    ALIAS     | FINGERPRINT  | PUBLIC |             DESCRIPTION              |  ARCH  |   SIZE   |         UPLOAD DATE         |
+--------------+--------------+--------+--------------------------------------+--------+----------+-----------------------------+
| web_image    | 84a4b1f466ad | no     |                                      | armv7l | 12.86MB  | Dec 4, 2018 at 2:46am (UTC) |
+--------------+--------------+--------+--------------------------------------+--------+----------+-----------------------------+
|              | 49b522955166 | no     | Alpine 3.8 armhf (20181203_13:03)    | armv7l | 2.26MB   | Dec 3, 2018 at 5:11pm (UTC) |
+--------------+--------------+--------+--------------------------------------+--------+----------+-----------------------------+
Scaling up the template container
And with that webserver image, I can replicate it as many times as I have disk space and memory. I tried 10, but based on how much memory it was using, I think I could have gone to twenty on the Pi.
$ lxc ls
+--------+---------+------------------------+----------------------------------------------+------------+-----------+
|  NAME  |  STATE  |          IPV4          |                     IPV6                     |    TYPE    | SNAPSHOTS |
+--------+---------+------------------------+----------------------------------------------+------------+-----------+
| alpine | RUNNING | 192.168.215.104 (eth0) | fd6a:c19d:b07:2080:216:3eff:fecf:bef5 (eth0) | PERSISTENT | 0         |
|        |         |                        | 2001:db8:ebbd:2080:216:3eff:fecf:bef5 (eth0) |            |           |
+--------+---------+------------------------+----------------------------------------------+------------+-----------+
| w10    | RUNNING | 192.168.215.225 (eth0) | fd6a:c19d:b07:2080:216:3eff:feb2:f03d (eth0) | PERSISTENT | 0         |
|        |         |                        | 2001:db8:ebbd:2080:216:3eff:feb2:f03d (eth0) |            |           |
+--------+---------+------------------------+----------------------------------------------+------------+-----------+
| w2     | RUNNING | 192.168.215.232 (eth0) | fd6a:c19d:b07:2080:216:3eff:fe7f:b6a5 (eth0) | PERSISTENT | 0         |
|        |         |                        | 2001:db8:ebbd:2080:216:3eff:fe7f:b6a5 (eth0) |            |           |
+--------+---------+------------------------+----------------------------------------------+------------+-----------+
| w3     | RUNNING | 192.168.215.208 (eth0) | fd6a:c19d:b07:2080:216:3eff:fe63:4544 (eth0) | PERSISTENT | 0         |
|        |         |                        | 2001:db8:ebbd:2080:216:3eff:fe63:4544 (eth0) |            |           |
+--------+---------+------------------------+----------------------------------------------+------------+-----------+
| w4     | RUNNING | 192.168.215.244 (eth0) | fd6a:c19d:b07:2080:216:3eff:fe99:a784 (eth0) | PERSISTENT | 0         |
|        |         |                        | 2001:db8:ebbd:2080:216:3eff:fe99:a784 (eth0) |            |           |
+--------+---------+------------------------+----------------------------------------------+------------+-----------+
| w5     | RUNNING | 192.168.215.118 (eth0) | fd6a:c19d:b07:2080:216:3eff:fe31:690e (eth0) | PERSISTENT | 0         |
|        |         |                        | 2001:db8:ebbd:2080:216:3eff:fe31:690e (eth0) |            |           |
+--------+---------+------------------------+----------------------------------------------+------------+-----------+
| w6     | RUNNING | 192.168.215.200 (eth0) | fd6a:c19d:b07:2080:216:3eff:fee2:8fc7 (eth0) | PERSISTENT | 0         |
|        |         |                        | 2001:db8:ebbd:2080:216:3eff:fee2:8fc7 (eth0) |            |           |
+--------+---------+------------------------+----------------------------------------------+------------+-----------+
| w7     | RUNNING | 192.168.215.105 (eth0) | fd6a:c19d:b07:2080:216:3eff:feec:baf7 (eth0) | PERSISTENT | 0         |
|        |         |                        | 2001:db8:ebbd:2080:216:3eff:feec:baf7 (eth0) |            |           |
+--------+---------+------------------------+----------------------------------------------+------------+-----------+
| w8     | RUNNING | 192.168.215.196 (eth0) | fd6a:c19d:b07:2080:216:3eff:fe90:10b2 (eth0) | PERSISTENT | 0         |
|        |         |                        | 2001:db8:ebbd:2080:216:3eff:fe90:10b2 (eth0) |            |           |
+--------+---------+------------------------+----------------------------------------------+------------+-----------+
| w9     | RUNNING | 192.168.215.148 (eth0) | fd6a:c19d:b07:2080:216:3eff:fee3:e5b2 (eth0) | PERSISTENT | 0         |
|        |         |                        | 2001:db8:ebbd:2080:216:3eff:fee3:e5b2 (eth0) |            |           |
+--------+---------+------------------------+----------------------------------------------+------------+-----------+
| web    | RUNNING | 192.168.215.110 (eth0) | fd6a:c19d:b07:2080:216:3eff:fe29:7f8 (eth0)  | PERSISTENT | 1         |
|        |         |                        | 2001:db8:ebbd:2080:216:3eff:fe29:7f8 (eth0)  |            |           |
+--------+---------+------------------------+----------------------------------------------+------------+-----------+
All of the webservers have their own unique IPv6 address, and all of them are running on port 80, something that can't be done using NAT.
LXC plays well with DNS
Unlike Docker,
LXC containers retain the same IPv6 address after being start and stopped. And if you are starting multiple containers, the order of starting doesn't change the address (as Docker does).
This means that you can assign names to your LXC Containers without a lot of DNS churn. Here's a chunk from my DNS zone file:
lxcdebian   IN  AAAA    2001:db8:ebbd:2080:216:3eff:feae:a30
lxcalpine   IN  AAAA    2001:db8:ebbd:2080:216:3eff:fe4c:4ab2
lxcweb      IN  AAAA    2001:db8:ebbd:2080:216:3eff:fe29:7f8
lxcw2       IN  AAAA    2001:db8:ebbd:2080:216:3eff:fe7f:b6a5
lxcdocker1  IN  AAAA    2001:db8:ebbd:2080:216:3eff:fe58:1ac9
DNS is your friend when using IPv6. With DNS entries, I can point my web browser to the servers running on these containers. I can
even ssh in to the container, just like any host on my network.
Linux Containers + Docker
While it is possible to run Docker inside a Linux Container and over come some of the IPv6 limitations of Docker, it is a heavy weight solution (read: uses more RAM and disk). If you are thinking of scaling up an application, you would be better off customizing a Linux Container with a native application, rather than using a pre-canned Dockker app.
Address Stability
Because all of this is running on LXC, there is address stability. Not matter how many times you reboot the Raspberry Pi, or restart containers in different order, the addresses remain the same. This means the addresses above can be entered into your DNS server with out churn. Something Docker doesn't provide.
Running a Virtual Network
LXC is the best at container customization, and virtual networking (IPv4 and IPv6). With LXCs flexibility, it is easy to create templates to scale up multiple applications . Now you have a server farm in the palm of your hand, with excellent IPv6 support! Perhaps the Docker folks will take note.


