Monday, November 18, 2019

Using IPv6 Link-Local to the Rescue

Rescue!

IPv6 to the Rescue

by Craig Miller


Your embedded device has been running great for the past few weeks, and now all the sudden, it can't be found on the network. You can't ssh into see what the problem is, it has just disappeared.
Lots of reasons why this may have happened, perhaps the program hit a bug and crashed, or more likely, it has forgotten its IPv4 address. Sure you can just "turn it off and on again" and that may fix the problem, or it could make it worse, if it was writing out to the SD Card at the time you pulled power.
The real answer is to log in and find out what is really going on, but as I said, for some reason your Pi, router, or device isn't responding. So what do you do?

IPv6 to the Rescue


But if you setup your network as a dual-stack network, then your device already has not only an IPv4 address, but also an IPv6 address as well. And if you put the IPv6 address into your local DNS, then you can just ssh to the hostname, and see what is going on with your device.
But what if you do have a dual-stack network (your ISP is providing IPv6) but you haven't really done anything with IPv6. How can you use it to rescue your device?
ssh to the IPv6 address of the device, and Bob's your uncle.

Finding the IPv6 Address of your device


Unlike IPv4 network scanners, scanning IPv6 networks is much more challenging. After all, instead of looking at 254 addresses, you are now looking to scan 18,446,744,073,709,551,616 or 18 quintillion addresses. Assuming that you use the fastest scanner zmap which claims to be able to scan the entire IPv4 internet (all 4 billion addresses) in 45 minutes. With 18 quintillion possible addresses, it is still going to take 367,719 years! (2^32 *45 min / 60 min/ 24 hours/ 365 days). And zmap doesn't support IPv6 (and you can see why)
Fortunately, there are non-brute-force solutions to the problem.

IPv6 Basics, the all-nodes address


Although there is no broadcast in IPv6, there is a specific multicast address that all nodes must listen to. This is called the all-nodes address, or ff02::1. It is possible to send a ping to the all-nodes address, and get multiple responses back, similar to pinging the IPv4 broadcast address will (used to) return multiple responses.
$ ping6 -c 2 -I wlan0 ff02::1
PING ff02::1(ff02::1) from fe80::f203:8cff:fe3f:f041%wlan0 wlan0: 56 data bytes
64 bytes from fe80::f203:8cff:fe3f:f041%wlan0: icmp_seq=1 ttl=64 time=0.140 ms
64 bytes from fe80::2ac6:8eff:fe16:19d7%wlan0: icmp_seq=1 ttl=64 time=7.32 ms (DUP!)
64 bytes from fe80::21e:6ff:fe33:e990%wlan0: icmp_seq=1 ttl=64 time=7.66 ms (DUP!)
64 bytes from fe80::216:3eff:fea2:94e8%wlan0: icmp_seq=1 ttl=64 time=8.67 ms (DUP!)
64 bytes from fe80::ba27:ebff:fe89:bc51%wlan0: icmp_seq=1 ttl=64 time=9.60 ms (DUP!)
64 bytes from fe80::4aa2:12ff:fec2:16df%wlan0: icmp_seq=1 ttl=64 time=9.73 ms (DUP!)
64 bytes from fe80::216:3eff:feff:2f9d%wlan0: icmp_seq=1 ttl=64 time=10.6 ms (DUP!)
64 bytes from fe80::f203:8cff:fe3f:f041%wlan0: icmp_seq=2 ttl=64 time=0.686 ms

--- ff02::1 ping statistics ---
2 packets transmitted, 2 received, +6 duplicates, 0% packet loss, time 1002ms
rtt min/avg/max/mdev = 0.140/6.814/10.696/3.840 ms

In IPv6, multicast addresses are associated with multiple interfaces (there is an all-nodes address on each interface), therefore it is necessary to specify an interface -I to ping.

OK, but how to we find the IPv6 address in my dual-stack network?


Using an open source utility, v6disc.sh, which uses the all-nodes technique discovers the nodes on your IPv6 network in a matter of seconds, rather than years.
$ ./v6disc.sh 
WARN: avahi utis not found, skipping mDNS check 
-- Searching for interface(s) 
-- Found interface(s):  eth0 
-- INT:eth0 prefixs: 2001:470:db8:101 
-- Detecting hosts on eth0 link 

-- Discovered hosts for prefix: 2001:470:db8:101 on eth0 
2001:470:db8:101::1                      00:24:a5:f1:07:ca    Buffalo
2001:470:db8:101:203:93ff:fe67:4362      00:03:93:67:43:62    Apple
2001:470:db8:101:211:24ff:fece:f1a       00:11:24:ce:0f:1a    Apple
2001:470:db8:101:211:24ff:fee1:dbc8      00:11:24:e1:db:c8    Apple
2001:470:db8:101:226:bbff:fe1e:7e15      00:26:bb:1e:7e:15    Apple
2001:470:db8:101::303                    d4:9a:20:01:e0:a4    Apple
2001:470:db8:101:3e2a:f4ff:fe37:dac4     3c:2a:f4:37:da:c4    BrotherI
2001:470:db8:101:6a1:51ff:fea0:9339      04:a1:51:a0:93:38    Netgear
2001:470:db8:101:b41f:18a3:a97c:4a0c     10:9a:dd:54:b6:34    Apple
2001:470:db8:101::9c5                    b8:27:eb:89:bc:51    Raspberr
The utility looks up the Ethernet MAC address manufacturer and prints it in the third column.
As you can see it is easy to spot the Raspberry Pi on this network.

But wait, I don't have a dual-stack network, now what?


So you have Shaw for an ISP, and they can't spell IPv6, now what? Another IPv6 fact is that every device which has an IPv6 stack, must have a link-local address. The link-local address is used for all sorts of things, including Neighbour Discovery Protocol (NDP), the IPv6 equivalent of ARP. Therefore, even if your network doesn't have an IPv6 connection to the internet, your IPv6-enabled device will have a link-local address.
Fortunately, v6disc.sh also can detect link-local addresses as fast as it detects IPv6 global addresses (in mere seconds).
$ ./v6disc.sh -i wlan0 -L
WARN: avahi utis not found, skipping mDNS check 
-- INT:wlan0    prefixs:  
-- Detecting hosts on wlan0 link 
-- Discovered hosts for prefix: fe80: on wlan0 
fe80::216:3eff:fea2:94e8                 00:16:3e:a2:94:e8    Xensourc
fe80::216:3eff:feff:2f9d                 00:16:3e:ff:2f:9d    Xensourc
fe80::21e:6ff:fe33:e990                  00:1e:06:33:e9:90    Wibrain
fe80::2ac6:8eff:fe16:19d7                28:c6:8e:16:19:d7    Netgear
fe80::4aa2:12ff:fec2:16df                48:a2:12:c2:16:df    
fe80::ba27:ebff:fe89:bc51                b8:27:eb:89:bc:51    Raspberr
fe80::f203:8cff:fe3f:f041                f0:03:8c:3f:f0:41    Azurewav
-- Pau 
Link-local addresses are not globally unique, and therefore an interface must be specified with the -i, and the -L tells v6disc.sh to only detect link-local addresses.
Again, as you can see, it is easy to pick out the Raspberry Pi link-local address on this network.

Now I have the IPv6 address, how do I use it?


With the Global or link-local IPv6 address, all one need to do it ssh into the lost device and find out what is going on.
If using the link-local address, the interface must also be specified with the %intf notation (e.g. <link-local_addr>%wlan0) :
$ ssh cvmiller@fe80::ba27:ebff:fe79:bc51%wlan0
cvmiller@fe80::ba27:ebff:fe79:bc51%wlan0's password: 
Welcome to Ubuntu 18.04.1 LTS (GNU/Linux 4.15.0-1030-raspi2 armv7l)

Last login: Mon Sep 30 19:57:11 2019 from fe80::2ac6:8eff:fe16:19d7%br0
$

Go forth and Rescue


And now you are logged into your wayward device, and you can troubleshoot to figure out what went wrong.


Originally published on Makiki.ca


Thursday, August 8, 2019

IPvFoo, Identifying IPv6 Servers


Traffic

Firefox & Chrome Extension
The transition to IPv6 will be a long one. Even with Google measuring 25% utilization world-wide on the IPv6 internet, many services will be running dual-stack for some time to come.

IPv6-only


But there are those who have already moved to IPv6-only networks, most notably Facebook, and T-Mobile. They run a variety of transition mechanisms to help external IPv4-only services connect or traverse their IPv6-only networks.
But what if you just wanted to check your own servers to ensure they are ready for IPv6-only? Modern applications pull in javascript from many sources, and those external sources may not be available on IPv6, thus breaking your IPv6-only deployment.
There is an excellent extension to Chrome and Firefox which not only displays if the website is over IPv6, but also all the web page elements referred to on a given web page.
IPvFoo Screenshot


Looking for the Green 6


IPvFoo will put a green 6 or red 4 in the upper right corner of the browser indicating which network transport (IPv6 or IPv4 respectively) was used. In addition, a smaller 4 and/or 6 will be displayed to the right of the large 4/6 indicating referenced sites by the webpage.
Clicking on the 6 or 4, will display a list of referred sites and what addresses were used will pop up.


Looking up who owns that address


By right-clicking an address on the right side of the pop-up list, an option of Look up on bgp.he.net. Click that, and Hurricane electric will not only display the AS (autonomous system) that announced that IP block, but clicking on the whois tab will show you who is registered for that IP block.
IPvFoo Screenshot


Creating a IPv6-only site


When creating an IPv6-only site, IPvFoo can quickly tell you if not only your server is running IPv6, but also the references that your web application might be using. In a IPv6-only network, the IPv4 references will not connect (unless you are using a transition mechanism like NAT64)
But why should you create an IPv6-only site. Frankly it is easier and faster, with only one protocol and firewall/ACLs to manage, and no transition mechanisms to traverse. If you believe the projections, the IPv6 Internet will be at 80% by 2025, that is only a little more than fiveyears from now.


Be Ready for the Future Now


IPvFoo not only displays if you are IPv6-only ready, but is interesting to see how the rest of the world is building web sites as well.

Monday, March 4, 2019

Linux Containers, building virtualization for the future with IPv6


Traffic
Server Farm in the Palm of your hand
I have recently been exploring Docker containers on SBCs (Small Board Computers), including the Raspberry Pi. The Docker eco-system is impressive in the amount of preconfigured containers that are available. However, as I have written before, it falls down on networking support, specifically IPv6 support. The best one can do is NAT6 on IPv6, which just perpetuates the complexities (and evils) of NAT.
The biggest problem with the Docker IPv6 implementation is that it was an after thought. Unfortunately, this is not uncommon. Think of adding security after the fact, and you will quickly discover the poorly implemented security model. Docker is limited in this kind of after-thought thinking.

Linux Containers


Another container technology which can also run on SBCs is Linux Containers (LXC/LXD). LXC shares the host's kernel and is lighter weight than traditional Virtual Machines. But each LXC Container is isolated via namespaces and control groups, so it appears to have its own network stack. And therefore is more flexible than Docker.

Qualifying the SBC OS for LXC/LXD


Before going too far in installing Linux Containers, it is best to ensure that the OS will support LXC. There are a couple of requirements of the Host OS:
  • Is LXD and LXD-Client in the repo (easy to install with apt-get)
  • Does the kernel support namespaces
The first is easy, search for the packages:
$ apt-cache search lxd-client
lxd-client - Container hypervisor based on LXC - client
The second involves what support was compiled into the kernel when it was built. Namespaces allow the kernel to create separate network areas, each with its own firewall rules. The easiest way to determine this is to look for namespace items in /proc
$ ls /proc/self/ns
ipc  mnt  net  pid  user  uts

Unfortunately, the raspian kernel from raspberrypi.org doesn't support namespaces.

Getting a LXC/LXD compatible OS


Fortunately, there is an unofficial Ubuntu 18.04 image available for the Pi which does. This image is compressed and must be decompressed before flashed to a SD Card.

Make sure you follow the steps on the Ubuntu page to set an initial password for the ubuntu user.

Additionally follow the steps to boot the unofficial image on the Raspberry 3B+. Be sure to update the config.txt file and update the bootloader files. The Raspsberry 3B can boot the unofficial image without these extra steps.

Preparing the LXC Host (aka the Pi)


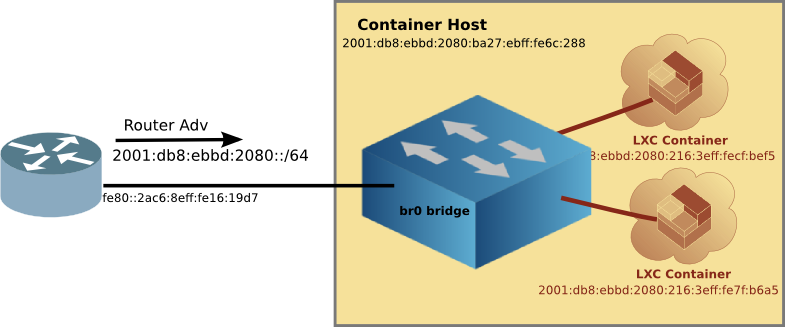
The key networking difference between Docker and LXC is that with LXC one can attach a container to any bridge on the Host. This includes a bridge on the outside interface. Via transparent bridging the container can have unfettered access to the existing IPv6 subnet, including picking up Global Unique Addresses (GUAs) without the host having to do router-like functions, such as adding routes, auto propagation of prefixes (with DHCPv6-PD), redistribution of routes, etc. Again, things which Docker doesn't support.

Setting up an external bridge interface on the Host


Once you have the right kernel and distro, configure a bridge br0 which will in-turn have the ethernet interface as a member. This is best done from the Pi itself using a keyboard and monitor, rather than ssh-ing to a headless device. Because when you mess up, you are still connected to the Pi (believe me, it is easy to get disconnected with all interfaces down). Logically the bridge, br0 will not only be attached to the eth0 interface, but later on, the LXC Containers as well.
External Bridge


Installing LXC/LXD


Once setting up the br0 interface is done, we can install lxd and lxd-client. Linux Containers has been evolving of the years, and it is now (as I write this) up to version 3.0.2.

A note about versions


There is quite a bit on the internet about older versions of Linux Containers. If you see hyphenated commands like lxc-launch then stop and move to another page. Hyphenated commands are the older version 1 or 2 of Linux Containers.

A quick tour of LXC/LXD


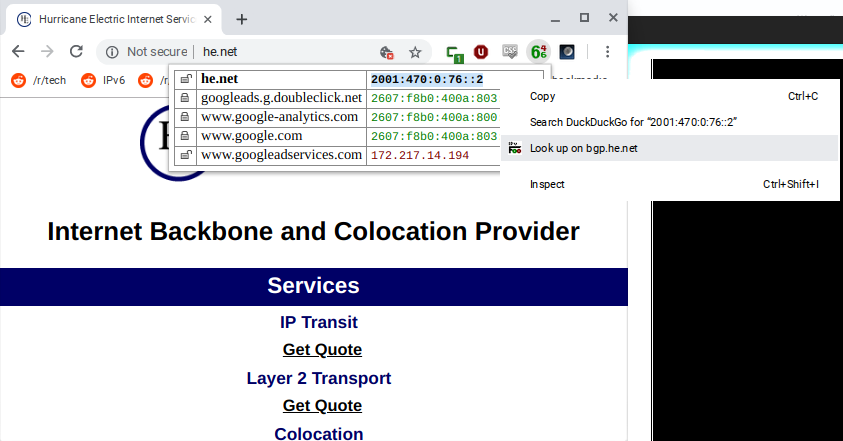
Canonical has a nice Try It page, where you can run LXC/LXD in the comfort of your web browser without installing anything on your local machine. The Try It sets up a VM which has IPv6 access to the outside world, where you can install and configure LXC/LXD, even create Linux Containers. It is well worth the 10 minutes to run through the hands on tutorial.

Doing the install


Installing LXD will pull in lxc as well. And because we are using Ubuntu 18.04LTS, it is as simple as using apt-get
sudo apt-get install lxd lxd-client

But wait! It is already installed on this image. Although it is version 3.0.0, and the easiest way to get it to the latest version is to run:
$ sudo apt-get update
$ sudo apt-get upgrade lxd lxd-client

Add yourself to the lxd group so you won't have to type sudo all the time.
sudo usermod -aG lxd craig
newgrp lxd


LXD Init


The LXD init script sets up LXD on the machine with a set of interactive questions. It is safe to accept all the defaults (just press return).
$ sudo lxd init

Default LXD Networking


Since we took all the defaults of lxd init it created another bridge on the system lxdbr0 which the YAML file would lead you to believe it is also bridged to the outside world, but it is not. The default config is similar to Docker, in that it creates a lxdbr0 bridge which uses NAT4 and NAT6 to connect to the outside world.

But we don't care, because we have created a bridge br0 which is transparently bridged to the outside world. And unlike Docker, individual containers can be attached to any bridge (either br0 or if you want NAT, lxdbr0)

Create a profile for the external transparent bridge (br0)

There is one more thing we have to do before running the first Linux Container, create a profile for the br0 bridge. Edit the profile to match the info below:
lxc profile create extbridge
lxc profile edit extbridge
    config: {}
    description: bridged networking LXD profile
    devices:
      eth0:
        name: eth0
        nictype: bridged
        parent: br0
        type: nic
    name: extbridge
    used_by:

Note: if you prefer vi to whatever editor comes up when editing the profile, set the environment variable below, then edit the profile.
export EDITOR=vi

The Linux Container network is now ready to attach containers to the br0 bridge like this:
container network

You may notice the bottom LXC container with Docker, more on this later.

Running the first Linux Container


So now it is time to have fun by running the first container. I suggest Alpine Linux because it is small, and quick to load. To create and start the container type the following:
lxc launch -p default -p extbridge images:alpine/3.8 alpine

LXD will automatically download the Alpine Linux image from the Linux Containers image server, and create a container with the name alpine. We'll use the name alpine to manage the container going forward.

Typing lxc ls will list the running containers
$ lxc ls
+---------+---------+------------------------+----------------------------------------------+------------+-----------+
|  NAME   |  STATE  |          IPV4          |                     IPV6                     |    TYPE    | SNAPSHOTS |
+---------+---------+------------------------+----------------------------------------------+------------+-----------+
| alpine  | RUNNING | 192.168.215.104 (eth0) | fd6a:c19d:b07:2080:216:3eff:fecf:bef5 (eth0) | PERSISTENT | 0         |
|         |         |                        | 2001:db8:ebbd:2080:216:3eff:fecf:bef5 (eth0) |            |           |
+---------+---------+------------------------+----------------------------------------------+------------+-----------+

You will note that the container has not only a IPv4 address from my DHCP server, but it also has an IPv6 GUA (and in this case, an additional IPv6 ULA, Unique Local Address).

YAML overlaying


The alpine container has a GUA because we used two -p (profile) parameters when creating it. The first is the default profile which as I mentioned earlier is set up for NAT4 and NAT6. And the second is the extbridge profile we setup as a profile. The lxc launchcommand pulls in the YAML info from the default profile, and then overlays the extbridge profile, effectively overwriting the parts we want so that the alpine container is attached to br0 and the outside world!

Stepping into Alpine


Of course, what good is starting a Linux Container if all you can do is start and stop it. A key difference from Docker is that Linux Containers are not read-only, but rather you can install software, configure it the way you like, and then stop the container. When you start it again, all the changes you made are still there. I'll talk about the goodness of this a little later.

But in order to do that customization one needs to get inside the container. This is done with the following command:
$ lxc exec alpine -- /bin/sh
~ # 

And now you are inside the running container as root. Here you can do anything you can do on a normal linux machine, install software, add users, start sshd, so you can ssh to it later, and so on. When you are done customizing the container type:
~ # exit
craig@pai:~$ 

And you are back on the LXC Host.

Advantages of customizing a container


A key advantage of customizing a container, is that you can create a template which then can be used to crate many instances of that customized application. For example, I started with alpine installed nginx and php7 and created a template image, which I called web_image. I used the following commands on the host, after installing the webserver with PHP inside the container:
$ lxc snapshot alpine snapshot_web                   # Make a back up of the container
$ lxc publish alpine/snapshot_web --alias web_image  # publish the back up as an image
$ lxc image list                                     # show the list of images
+--------------+--------------+--------+--------------------------------------+--------+----------+-----------------------------+
|    ALIAS     | FINGERPRINT  | PUBLIC |             DESCRIPTION              |  ARCH  |   SIZE   |         UPLOAD DATE         |
+--------------+--------------+--------+--------------------------------------+--------+----------+-----------------------------+
| web_image    | 84a4b1f466ad | no     |                                      | armv7l | 12.86MB  | Dec 4, 2018 at 2:46am (UTC) |
+--------------+--------------+--------+--------------------------------------+--------+----------+-----------------------------+
|              | 49b522955166 | no     | Alpine 3.8 armhf (20181203_13:03)    | armv7l | 2.26MB   | Dec 3, 2018 at 5:11pm (UTC) |
+--------------+--------------+--------+--------------------------------------+--------+----------+-----------------------------+


Scaling up the template container


And with that webserver image, I can replicate it as many times as I have disk space and memory. I tried 10, but based on how much memory it was using, I think I could have gone to twenty on the Pi.
$ lxc ls
+--------+---------+------------------------+----------------------------------------------+------------+-----------+
|  NAME  |  STATE  |          IPV4          |                     IPV6                     |    TYPE    | SNAPSHOTS |
+--------+---------+------------------------+----------------------------------------------+------------+-----------+
| alpine | RUNNING | 192.168.215.104 (eth0) | fd6a:c19d:b07:2080:216:3eff:fecf:bef5 (eth0) | PERSISTENT | 0         |
|        |         |                        | 2001:db8:ebbd:2080:216:3eff:fecf:bef5 (eth0) |            |           |
+--------+---------+------------------------+----------------------------------------------+------------+-----------+
| w10    | RUNNING | 192.168.215.225 (eth0) | fd6a:c19d:b07:2080:216:3eff:feb2:f03d (eth0) | PERSISTENT | 0         |
|        |         |                        | 2001:db8:ebbd:2080:216:3eff:feb2:f03d (eth0) |            |           |
+--------+---------+------------------------+----------------------------------------------+------------+-----------+
| w2     | RUNNING | 192.168.215.232 (eth0) | fd6a:c19d:b07:2080:216:3eff:fe7f:b6a5 (eth0) | PERSISTENT | 0         |
|        |         |                        | 2001:db8:ebbd:2080:216:3eff:fe7f:b6a5 (eth0) |            |           |
+--------+---------+------------------------+----------------------------------------------+------------+-----------+
| w3     | RUNNING | 192.168.215.208 (eth0) | fd6a:c19d:b07:2080:216:3eff:fe63:4544 (eth0) | PERSISTENT | 0         |
|        |         |                        | 2001:db8:ebbd:2080:216:3eff:fe63:4544 (eth0) |            |           |
+--------+---------+------------------------+----------------------------------------------+------------+-----------+
| w4     | RUNNING | 192.168.215.244 (eth0) | fd6a:c19d:b07:2080:216:3eff:fe99:a784 (eth0) | PERSISTENT | 0         |
|        |         |                        | 2001:db8:ebbd:2080:216:3eff:fe99:a784 (eth0) |            |           |
+--------+---------+------------------------+----------------------------------------------+------------+-----------+
| w5     | RUNNING | 192.168.215.118 (eth0) | fd6a:c19d:b07:2080:216:3eff:fe31:690e (eth0) | PERSISTENT | 0         |
|        |         |                        | 2001:db8:ebbd:2080:216:3eff:fe31:690e (eth0) |            |           |
+--------+---------+------------------------+----------------------------------------------+------------+-----------+
| w6     | RUNNING | 192.168.215.200 (eth0) | fd6a:c19d:b07:2080:216:3eff:fee2:8fc7 (eth0) | PERSISTENT | 0         |
|        |         |                        | 2001:db8:ebbd:2080:216:3eff:fee2:8fc7 (eth0) |            |           |
+--------+---------+------------------------+----------------------------------------------+------------+-----------+
| w7     | RUNNING | 192.168.215.105 (eth0) | fd6a:c19d:b07:2080:216:3eff:feec:baf7 (eth0) | PERSISTENT | 0         |
|        |         |                        | 2001:db8:ebbd:2080:216:3eff:feec:baf7 (eth0) |            |           |
+--------+---------+------------------------+----------------------------------------------+------------+-----------+
| w8     | RUNNING | 192.168.215.196 (eth0) | fd6a:c19d:b07:2080:216:3eff:fe90:10b2 (eth0) | PERSISTENT | 0         |
|        |         |                        | 2001:db8:ebbd:2080:216:3eff:fe90:10b2 (eth0) |            |           |
+--------+---------+------------------------+----------------------------------------------+------------+-----------+
| w9     | RUNNING | 192.168.215.148 (eth0) | fd6a:c19d:b07:2080:216:3eff:fee3:e5b2 (eth0) | PERSISTENT | 0         |
|        |         |                        | 2001:db8:ebbd:2080:216:3eff:fee3:e5b2 (eth0) |            |           |
+--------+---------+------------------------+----------------------------------------------+------------+-----------+
| web    | RUNNING | 192.168.215.110 (eth0) | fd6a:c19d:b07:2080:216:3eff:fe29:7f8 (eth0)  | PERSISTENT | 1         |
|        |         |                        | 2001:db8:ebbd:2080:216:3eff:fe29:7f8 (eth0)  |            |           |
+--------+---------+------------------------+----------------------------------------------+------------+-----------+


All of the webservers have their own unique IPv6 address, and all of them are running on port 80, something that can't be done using NAT.


LXC plays well with DNS


Unlike Docker, LXC containers retain the same IPv6 address after being start and stopped. And if you are starting multiple containers, the order of starting doesn't change the address (as Docker does).
This means that you can assign names to your LXC Containers without a lot of DNS churn. Here's a chunk from my DNS zone file:
lxcdebian   IN  AAAA    2001:db8:ebbd:2080:216:3eff:feae:a30
lxcalpine   IN  AAAA    2001:db8:ebbd:2080:216:3eff:fe4c:4ab2
lxcweb      IN  AAAA    2001:db8:ebbd:2080:216:3eff:fe29:7f8
lxcw2       IN  AAAA    2001:db8:ebbd:2080:216:3eff:fe7f:b6a5
lxcdocker1  IN  AAAA    2001:db8:ebbd:2080:216:3eff:fe58:1ac9

DNS is your friend when using IPv6. With DNS entries, I can point my web browser to the servers running on these containers. I can even ssh in to the container, just like any host on my network.

Linux Containers + Docker


While it is possible to run Docker inside a Linux Container and over come some of the IPv6 limitations of Docker, it is a heavy weight solution (read: uses more RAM and disk). If you are thinking of scaling up an application, you would be better off customizing a Linux Container with a native application, rather than using a pre-canned Dockker app.

Address Stability


Because all of this is running on LXC, there is address stability. Not matter how many times you reboot the Raspberry Pi, or restart containers in different order, the addresses remain the same. This means the addresses above can be entered into your DNS server with out churn. Something Docker doesn't provide.

Running a Virtual Network


LXC is the best at container customization, and virtual networking (IPv4 and IPv6). With LXCs flexibility, it is easy to create templates to scale up multiple applications . Now you have a server farm in the palm of your hand, with excellent IPv6 support! Perhaps the Docker folks will take note.


Article (with more detail) available on www.makikiweb.com

Palm Photo by Alie Koshes

Friday, November 23, 2018

What makes a good IPv6 implementation?

Bad IPv6 support costs Money

I have been working with Docker lately, and as cool as the container technology is, it was originally built without consideration for IPv6, and then IPv6 was bolted on later. Making supporting IPv6 full of expensive work-a-rounds.

But that got me thinking what makes a good IPv6 implementation? Of course this is my opinion, and you are free to toss in other criteria, so think of this as a thought starter.

Why is this important?


With 25% of the internet carried over IPv6 as of this writing, if you are developing a product which has a lifetime of 5 to 10 years, and you aren't giving thought as to how you will support IPv6, then your product will:
  • A) fail, or
  • B) you will try to bolt on IPv6 on the side, or
  • C) have to be completely rewritten.
All of that costs money.

A good IPv6 device implementation


There are broad areas where IPv6 should work well.

Addressing


As much as I like the simplicity of SLAAC (Stateless Address Auto Config), there are certainly use cases where DHCPv6 is a better choice. A good implementation should:
  • Support both addressing methods, SLAAC, and DHCPv6
  • Be able to reestablish IPv6 GUA (Global Unique Address) once the device comes out of sleep/suspend or link down/up (systemd suffers this problem)
  • Play well with DNS. Very few of us enjoy typing IPv6 addresses, the implementation should have a stable IPv6 address which can be entered into DNS without requiring a lot of DNS churn.

Routing


IPv6 is not IPv4 with colons. There are somethings which are different for good reason.
  • Default routes are link-local addresses (Docker fails on this one big time). GUAs may change, link-locals shouldn't.
  • Supports RA (Router Advertisement) fields, RDNSS (DNS server), and DNSSL (DNS domain search list). Not much use having an address if the host can't resolve names
  • If the device is routing (such as Docker) then support DHCPv6-PD, and provide the option of prefix delegation into the container/downstream network.

Resiliency


Basic protection from network misconfiguration, or out right attacks makes the IPv6 device better prepared for production use.
  • Rational limit on the number of IPv6 addresses an interface may have. Before systemd, the Linux kernel defaulted to 16. This seemed like a good compromise. Back in systemd v232, it was possible to exhaust memory on an IPv6 host by feeding it Random RA addresses, creating a denial of service. FreeBSD v11.5 has a similar problem, where the system will add over 3000 IPv6 addresses, and the system will slow to a crawl.
  • Rational limit on the number of neighbours. IPv6 /64 networks are sparsely populated and therefore one shouldn't have to expect to support all 16 Quintilian (2^64) neighbours. Something like 1000, or even 256 should be enough.
  • Don't assume that the Linux Stack has your back. Since systemd has become widespread, there are many IPv6 systemd bugs, which weren't there in the pre-systemd kernel days. IPv6 is a different stack, be sure to test it.

Summary


I am sure I missing a few, but this is a start. When developing a product, the business case for supporting IPv6 well, is that it will save you money in the long run, by not having to go back and try to bolt IPv6 on, or rewrite your network stack later.


P.S I wouldn't recommend putting Docker into production because of the severe IPv6 limitations.

Yachts colliding: Creative Commons/ Mark Pilbeam

Wednesday, August 8, 2018

Babel: a routing protocol with wireless support

by Craig Miller


Traffic
Previously I wrote about resurrecting the old forgotten routing protocol, RIPng. In a small network of more than one router, you need a routing protocol to share information between the routers. I used RIPng for about six months, turned it on, and pretty much forgot that it was running. Worked like a charm in my wired network.
I moved to a new (to me) house this summer, and thought it was a good opportunity to try out a routing protocol which not only handles wired networks but also wireless. Babel seemed just the thing for this environment.

Enter Babel


Babel is a loop-avoiding distance-vector routing protocol that is robust and efficient both in ordinary wired networks and in wireless mesh networks. Based on the loss of hellos the cost of wireless links can be increased, making sketchy wireless links less preferred.
RFC 6126 standardizes the routing protocol.There are two implementations which are supported on OpenWrt routers, babeld and bird


Creating a network with redundant paths


Like anything in networking, it starts with the physical layer (wireless is a form of physical layer). I attached the wireless links of the backup link router to the production and test routers. Thus creating redundant path of connectivity within my house.
Network Diagram

Running BIRD with Babel


I chose bird6 (the IPv6 version of bird on OpenWrt) because I already had it installed on the routers for RIPng. It was merely a matter of commenting out the RIP section in the /etc/bird6.conf file, and enabling Babel.
The Bird Documentation provides an example. Add the following to /etc/bird6.conf get Babel running in bird6
protocol babel {
    interface "wlan0", "wlan1" {
        type wireless;
        hello interval 1;
        rxcost 512;
    };
    interface "br-lan" {
        type wired;
    };
    import all;
    export all;
}
In the example above, wlan0 is the 2.4 Ghz radio, and wlan1 is the 5 Ghz radio.

Checking the path of connectivity


When determining the connectivity path, traceroute6 (the IPv6 version) is your friend. Checking between the laptop and the DNS server, the path is:
$ traceroute6 6dns
traceroute to 6lilikoi.hoomaha.net (2001:db8:ebbd:4118::1) from 2001:db8:ebbd:bac0:d999:cd8a:cd9b:2037, port 33434, from port 49819, 30 hops max, 60 bytes packets
 1  2001:db8:ebbd:bac0::1 (2001:db8:ebbd:bac0::1)  4.561 ms  0.510 ms  0.487 ms 
 2  2001:db8:ebbd:4118::1 (2001:db8:ebbd:4118::1)  2.562 ms  2.193 ms  1.927 ms 
$ 
The traceroute is showing the path going clockwise through the 2.4 Ghz wireless link.

Network Failure!


To test how well Babel can automatically route around failed links, I started a ping to the DNS server from the laptop and disabled the 2.4 Ghz radio, thus blocking the link the pings were using, and waited...
$ ping6 6dns
PING 6dns(2001:db8:ebbd:4118::1) 56 data bytes
64 bytes from 2001:db8:ebbd:4118::1: icmp_seq=1 ttl=63 time=3.54 ms
64 bytes from 2001:db8:ebbd:4118::1: icmp_seq=2 ttl=63 time=1.64 ms
64 bytes from 2001:db8:ebbd:4118::1: icmp_seq=3 ttl=63 time=2.02 ms
64 bytes from 2001:db8:ebbd:4118::1: icmp_seq=4 ttl=63 time=1.64 ms
64 bytes from 2001:db8:ebbd:4118::1: icmp_seq=5 ttl=63 time=1.51 ms
64 bytes from 2001:db8:ebbd:4118::1: icmp_seq=6 ttl=63 time=1.65 ms
64 bytes from 2001:db8:ebbd:4118::1: icmp_seq=7 ttl=63 time=1.58 ms
64 bytes from 2001:db8:ebbd:4118::1: icmp_seq=8 ttl=63 time=5.80 ms
From 2001:db8:ebbd:bac0::1 icmp_seq=33 Destination unreachable: No route
From 2001:db8:ebbd:bac0::1 icmp_seq=34 Destination unreachable: No route
...
From 2001:db8:ebbd:bac0::1 icmp_seq=48 Destination unreachable: No route
From 2001:db8:ebbd:bac0::1 icmp_seq=49 Destination unreachable: No route
64 bytes from 2001:db8:ebbd:4118::1: icmp_seq=101 ttl=61 time=2.12 ms
64 bytes from 2001:db8:ebbd:4118::1: icmp_seq=102 ttl=61 time=3.42 ms
64 bytes from 2001:db8:ebbd:4118::1: icmp_seq=103 ttl=61 time=3.16 ms

As you can see the outage was 93 seconds (101 - 8). Not a record time, OSPF would converge much faster, but still it did fix itself without human intervention.
Checking the connectivity path with traceroute6:
$ traceroute6 6dns
traceroute to 6lilikoi.hoomaha.net (2001:db8:ebbd:4118::1) from 2001:db8:ebbd:bac0:d999:cd8a:cd9b:2037, port 33434, from port 47725, 30 hops max, 60 bytes packets
 1  2001:db8:ebbd:bac0::1 (2001:db8:ebbd:bac0::1)  0.541 ms  0.445 ms  0.437 ms 
 2  2001:db8:ebbd:2080::1 (2001:db8:ebbd:2080::1)  1.705 ms  1.832 ms  1.817 ms 
 3  2001:db8:ebbd:2000::1 (2001:db8:ebbd:2000::1)  2.273 ms  1.891 ms  2.584 ms 
 4  2001:db8:ebbd:4118::1 (2001:db8:ebbd:4118::1)  2.348 ms  2.822 ms  2.289 ms 
$
The path can now be seen to be traveling counter-clockwise around the circle via the 5 Ghz link. The Babel routing protocol is routing packets around the failure.

Wireless is great, except ...


As more and more things come online using wireless there will be more interference and contention for bandwidth, especially in the 2.4 Ghz band. Babel can enables routing of packets around sketchy wireless links due to interference in a crowded wifi environment.

Your Metric may vary


Because wireless is variable, Babel applies differing metrics to routes as the wireless signal changes. An unfortunate side effect of this is that the network is continuously converging (or changing). The route that may have been used last minute to the remote host, my be invalid the next minute.
I noticed this as my previously very stable IPv6-only servers were now disconnecting, or worse, not reachable.

Route Flapping!


As I looked at the OpenWrt syslog (using the logread command) I could see that the routes were continually changing.
Tue Jul 24 14:46:45 2018 daemon.info odhcpd[778]: Raising SIGUSR1 due to default route change
Tue Jul 24 14:46:46 2018 daemon.info odhcpd[778]: Using a RA lifetime of 1800 seconds on br-lan
Tue Jul 24 14:47:01 2018 daemon.info odhcpd[778]: Raising SIGUSR1 due to default route change
Tue Jul 24 14:47:02 2018 daemon.info odhcpd[778]: Using a RA lifetime of 1800 seconds on br-lan
Tue Jul 24 14:47:33 2018 daemon.info odhcpd[778]: Raising SIGUSR1 due to default route change
Tue Jul 24 14:47:34 2018 daemon.info odhcpd[778]: Using a RA lifetime of 1800 seconds on br-lan
Tue Jul 24 14:47:49 2018 daemon.info odhcpd[778]: Raising SIGUSR1 due to default route change
Tue Jul 24 14:47:50 2018 daemon.info odhcpd[778]: Using a RA lifetime of 1800 seconds on br-lan
Tue Jul 24 14:48:53 2018 daemon.info odhcpd[778]: Raising SIGUSR1 due to default route change
Tue Jul 24 14:48:54 2018 daemon.info odhcpd[778]: Using a RA lifetime of 1800 seconds on br-lan
...

The problem with this route flapping is that it was being propagated to the other routers which were busy adding and removing routes, causing unreachable to parts of my network. Not a desired behaviour.

Settling things down


To rid my network of the route churn, I changed the Babel wireless interfaces to wired, giving them a stable metric, no longer tied to the variability of the wireless signal quality (signal to noise).
The /etc/bird6.conf now looks like:
protocol babel {
    interface "wlan0", "wlan1" {
        type wired;
        hello interval 5;
    };
    interface "br-lan" {
        type wired;
    };
    import all;
    export all;
}
Restarting bird6, and looking at the syslog, a brief activity can be seen, then the route churn stops, and the network is stable.

My ssh connection was dropped as the network did an initial reconverge, and then I was able log back in and examine the syslog.

Babel, still a work in progress


Babel is still being actively developed, and has a more modern approach to wireless links (something that was near non-existent when RIPng was being standardized back in 1997). Like RIPng, it is easy to set up without having to understand the complexities of OSPF. It is easy to setup on OpenWrt routers and provides redundancy in your network. That said the wireless functionality as implemented by Bird (v 1.63) is not quite there. Fortunately, there is Bird v2.0 out, and I look forward to giving it a try when it comes to OpenWrt.

Postscript


Although the route churn has subsided, I re-measured the convergence time for Babel, and it was quite long, 317 seconds, probably due to the hello timer being set to 5 seconds.
In the end, I reverted my house network to RIPng. Running the same convergence test yielded an outage of only 11 seconds with no route churn.
Perhaps many of the Babel issues are just Bird's implementation. And there may be tweaks to reduce network converge times. I'd happily give Babel another chance, but for now, I'll stick with good ol' RIPng.


** if you are running a firewall, the default on OpenWrt/LEDE, you will need to put in a rule to accept IPv6 UDP port 6696

Originally posted (with more detail) on www.makikiweb.com

Monday, July 9, 2018

Running an IPv6-only webserver

by Craig Miller


There are times in the long struggle for IPv6 adoption that we forget that dual-stack is not the end goal, but merely a transition mechanism. If we are to get to the end goal, IPv6 Everywhere then it isn't enough to have IPv6-only clients on the internet, but also IPv6-only attached content servers.

IPv6-only webserver, easy right?


So how hard can it be? Find a hoster which offers IPv6-only attached servers, install apache, or your favourite webserver, and run, right?
Works great for all 20% that are on the IPv6 internet. But for the other 80% of traffic that is on the internet your server is invisible. Great if you are running a stealth server, not so great if it represents your business and you wanted your customers to reach your website.

Oh, that legacy protocol, IPv4


So not only do you want to have the cool IPv6-ers, but also those legacy IPv4-ers to get to your IPv6-only attached webserver.
One of the techniques to permit IPv4 access to your IPv6-only webserver is to us a HTTP Proxy server. The HTTP Proxy server listens to IPv4 (with a real routable IPv4 address) and then directs traffic to the correct IPv6-only server sitting behind it. Folks have been doing this kind of thing with IPv4 for nearly two decades, the proxy server is also called a load balancer.
Web Proxy Network

Gosh, all my "hits" are from the Proxy Server

So the Proxy Server does the conversion from IPv4 to IPv6, but now all the webserver log entries are from the Proxy Server.
rproxy46-sov-a.mythic-beasts.com - - [15/Jun/2018:01:36:17 +0000] "GET /...
rproxy46-sov-a.mythic-beasts.com - - [15/Jun/2018:01:38:28 +0000] "POST ...
rproxy46-sov-a.mythic-beasts.com - - [15/Jun/2018:01:38:32 +0000] "GET /...
rproxy46-hex-a.mythic-beasts.com - - [15/Jun/2018:01:45:15 +0000] "POST ...
rproxy46-hex-a.mythic-beasts.com - - [15/Jun/2018:01:45:19 +0000] "GET /...
rproxy46-hex-a.mythic-beasts.com - - [15/Jun/2018:01:45:24 +0000] "POST ...
rproxy46-hex-a.mythic-beasts.com - - [16/Jun/2018:03:09:30 +0000] "GET /...
Not all that useful for traffic analysis1. Fortunately, there is a Proxy Protocol which allows the Proxy Server to insert a X-Forwarded-For: line into the HTTP header. This line contains the hostname, or IP address of the original requester.

The Proxy Protocol


In apache, there is a mod-proxy-protocol module which interprets the X-Forwarded-For: line as the original requester, and the logs are now restored to what one would expect.
The downside of the mod-proxy-protocol module is that once it is enabled, the server will not respond correctly to a request without the X-Forwarded-For: line. It returns a 502 server error.
Unfortunately, this means that even though the server is IPv6-only connected, it can not receive requests that do not go through the proxy. The Proxy Server must be in the data path for both IPv4 and IPv6. For load balancer applications, this is understandable.
However, as a migration tool to enable the IPv6-only server to serve both IPv4 and IPv6 it is an unnecessary over-complication.
Even the improved apache module, mod_remoteip which also implements the Proxy Protocol (as of version 2.4.30), does not permit the Proxy Server to forward only IPv4 traffic, and accept IPv6 traffic natively (e.g. without the proxy server).

Controlling access to the server


The old apache 2.2 version of Access Control, using deny from ..., does work in version 2.4 but not with either of modules supporting the Proxy Protocol. To be fair, apache has been stating in their documentation that the old v2.2 way would be deprecated. One must now use the Require not ip ... to work with the mod-proxy-protocol module.
So, it was time to convert my Access List for my server, no time like the present, I guess.

The Downside of using a Proxy server


Other transition mechanisms, such as NAT64, are used less and less as more traffic flows over IPv6. Unfortunately, using a Proxy Server to serve IPv4 clients, requires that IPv6 traffic also must use the Proxy server (if proxy protocol is to be used). Which means that as IPv6 traffic increases, the Proxy Serer remains in the data path, abrogating one of the real advantages of an IPv6-only server, a direct connection.

Wrapping up


So the good news is that it is really easy to put content on IPv6 with an IPv6-only server. The less good news is that the content can also be served to IPv4 clients, but it is overly complicated to do so and in the 21st century, it shouldn't be this hard.

Note 1: Sure you could use Google-Analytics, or something equivalently convenient, but I would rather analyze my own data. Google doesn't need to know everything about me.

Article originally appeared on www.makikiweb.com

Thursday, March 8, 2018

IPv6 Printer Support: Finally getting there

by Craig Miller


I recently replaced my printer with a Brother laser printer. I was pleasantly surprised with the level of IPv6 support. Although the printer includes WLAN support, I already had an ethernet cable in place, and it was a snap to connect to the network.

The UI designers of printers long ago realized that the small 20 character display is too limited to provide useful information, and instead there are options to print out full pages of info, including the Network Info. On this, I could not only see the usual IPv4 info, but also the SLAAC address that the printer had picked up.

Typing in the SLAAC address only once


Armed with the SLAAC address, I updated my local DNS server, since I really only wanted to type the IPv6 address once. Once that task was done, it was a snap to log into the printer's management web page over IPv6 using the DNS name.

IPv6 info


Of course, IPv6 support isn't perfect. There is no DHCPv6 support, and the IP Filtering feature is still  IPv4-only. So the next step for Brother is feature parity, but it is a good start.

Investigating IPv6 Printer Services


Even without feature parity, a quick scan by nmap reveals that the printing services are also available over IPv6.

Starting Nmap 6.40 ( http://nmap.org ) at 2018-03-05 09:16 PST
Nmap scan report for 6kunane.hoomaha.net (2001:470:ebbd:0:3e2a:f4ff:fe37:dac4)
Host is up (0.010s latency).
Not shown: 995 closed ports
PORT     STATE SERVICE
80/tcp   open  http
443/tcp  open  https
515/tcp  open  printer
631/tcp  open  ipp
9100/tcp open  jetdirect

Printing from an IPv6-only network


And I was able to successfully print to the Brother printer which sits on my dual-stack network from my IPv6-only network. Kudos to Brother.


Wednesday, January 17, 2018

Writing IPv6 Apps: Python Webserver

by Craig Miller


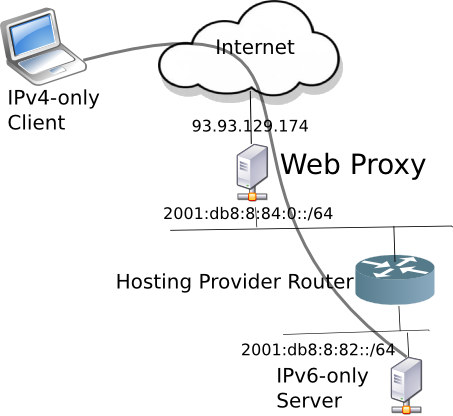
Moving to IPv6 starts at home. Applications have to speak IPv6 as well as the network. The good news is that there is lots of software available which already supports IPv6. Unfortunately, there is much more that doesn't.

For example, a Python-based webserver. Certainly not ready for a production network, but handy as a learning tool about how easy it can be to support IPv6 in your application.

Why Python? Python is a wonderful programming language, and getting only better with version 3. There are libraries for most needs, including one which serves up the web. And it runs just about anywhere that Python runs (Windows, Linux, BSD, Mac, Pi, ODROID, etc)

Python module SimpleHTTPServer


The python module SimpleHTTPServer supports IPv4 out of the box with the simple command:
python -m SimpleHTTPServer
However it does not support IPv6. There is no one-line equivalent to support IPv6, so a small script is required.

Looking at the code


The ipv6-httpd script is a short script supporting both IPv4 and IPv6. Looking at the following sections:
  1. Initialization of the HTTPServer object (from SimpleHTTPServer library)
  2. Class creation (of HTTPServerV6) to support IPv6
As with all Python scripts, the details roll backwards from the bottom. Initialization occurs in main
def main():
    global server
    server = HTTPServerV6(('::', listen_port), MyHandler)
    print('Listening on port:' + str(listen_port) + '\nPress ^C to quit')
    server.serve_forever()
    os._exit(0)

The IPv6 part


In order to support IPv6, we use a bit of object oriented inheritance trickery to modify the default of an existing class HTTPServer
class HTTPServerV6(HTTPServer):
    address_family = socket.AF_INET6
This creates a new class (which is used in our server ) with the address_family set to AF_INET6 (aka IPv6). This two-line change to the script transforms an IPv4-only script into an application that also supports IPv6.

Running the code


Now that we have a server which supports both IPv4 and IPv6, all we need to do is cd to the directory we wish to share, and start the server
$ cd public/
$ ~/bin/ipv6-httpd.py 
Listening on port:8080
Press ^C to quit
2001:db8:ebbd:0:4d18:71cd:b814:9508 - - [09/Jul/2017 11:49:41] "GET / HTTP/1.1" 200 -
^CCaught SIGINT, dying

The webserver log is sent to standard out (stdout), and can be redirected to a file if desired. In the above example, an IPv6 client ..:9508 requests an index, then the server is terminated with a ^C.
Want to server from a different directory? Stop the server, cd to another directory, and restart the server, it will now serve files from the new current working directory (cwd) location.

Security (or lack there of)


This example is a personal webserver, designed to be started and stopped whenever you need it. It is NOT a production quality webserver that you should put on the internet. However it shows that supporting IPv6 doesn't have to be a hardship.

Adding IPv6 Support to your App


As you can see, it doesn't have to be difficult to add IPv6 to your apps, you just need to give it some thought when planning your App. By adding IPv6, you will future proof your App by being ready for the future of the Internet.


Sunday, November 19, 2017

Filtering Fragments

by Craig Miller


Overcoming fragmentation
Fragmentation is different in IPv6, end stations perform fragmentation, not routers. That said, there are valid security concerns about exploits which hide the true contents of a packet by encapsulating it in a fragmentation extension header. (see Little bitsy pieces) But one needs to be careful about filtering all packets with fragmentation headers.

Filtering all Fragmentation Headers can lead to DNS failures

Case in point, Google's public IPv6 DNS servers until recently (Oct 2017) were clearly filtering fragmented responses (from authoritative servers). Small requests would succeed while large requests would fail.

Careful with that Axe Eugene

While is is a good idea to filter extension headers, such as the fragmentation header when the packet is on link (Advice for IPv6 Router Advertisement Guard RFC 7113). One should not apply a blanket filter to all fragmented packets.  Although PMTUD (Path MTU Discovery) is quite good at reducing fragmentation, there are valid reasons why a packet, such as a DNS response with many IPv6 addresses, could be fragmented.

Be careful with filters/ACLs/Firewall Rules, and be sure you are only filtering unwanted traffic.


* creative commons photo by James Ho

Tuesday, September 26, 2017

Request: Less Dynamic Prefix, Mr./Ms. ISP

by Craig Miller


There are two types of Global Prefixes, one that is provider independent (PI), allowing one to switch ISPs and keep the same prefix, and the other is provider aggregatable (PA), where the upstream provider allocates a prefix from their block.

PIs are great, and one need only go to your local RIR (Regional Internet Registry) to request/pay for a prefix block. But realistically, only larger organizations will go this route. Many smaller organizations and homes will use PA prefixes.

PA made easy

Through the magic of DHCPv6-PD (DHCPv6 with Prefix Delegation), allocating a prefix (either a /64 or less) to a small business or home is easy. Modern routers will make the PD request, and advertise the allocated prefix into the SOHO/home LAN, and IPv6 end to end connectivity is available.

ISPs are used to having their customers have a dynamic DHCPv4 address. But with many ISPs, a router reboot will result in the same IPv4 address, since the router is using the same MAC address to make the request.

With DHCPv6, a DUID (DHCP Unique Identifier) is used rather than a MAC address. But similar to the MAC address in DHCPv4, the DUID does not change between router reboots, and therefore DHCPv6 requests can receive the same external IPv6 address on the router.

PA Prefix disconnect

Alas, this is not the same for PA prefixes. Inside the ISP, there seems to be no connection between DHCPv6 address allocated and PD prefix allocated to the customer. This results in a semi-static outside IPv6 address on the router, and a very dynamic (changing with every connection/reboot) PD prefix in the customer's LAN.

A very dynamic LAN prefix causes some challenges, such as:

  • downstream routers, may not update to the new prefix in a timely manner causing unknown network outages which are mysteriously fixed by rebooting
  • Some DNS sserver configuration requires a Global Address, if the SOHO/home is using its own DNS server, or a DNS service other than the ISPs, this configuration may require updating with each new PD prefix
  • Network servers on the LAN will have changing IPv6 addressesj, making file sharing, and other network services difficult
  • Firewall configuration, allowing external access

Some of these issues can be mitigated by using a ULA (Unique Local Address) prefix on the LAN in addition to the ISPs very dynamic PA GUA prefix. But that requires more IPv6 knowledge than just plug in play.

Please, a less dynamic PA prefix

Dear Mr./Ms. ISP, I would like to have less dynamic PA addresses. As a customer, I would like to have the address prefix (assigned via PD) linked with my DUID and DHCPv6 address records. At the end of the day, we all want IPv6 to be simpler for the customer.


* note, a provider provides a PA address via DHCPv6-PD (Prefix Delegation)